Adding a water pressure indicator to an OMC outboard.
Tell-tale, tale-tell, pee-stream, pee-hole, that little squirty thing -- later model OMCs have 'em and you want one on yours.
The water pump is a crucial element in preserving the health of your
outboard. It's vitally important to know that it's functioning
properly. That's where the water pressure indicator comes in. It
functions by tapping into the water-jacket in your powerhead and
providing a visible relief outlet, or "pee stream". The outlet is
small, and has limited flow so water pressure is still maintained
in the powerhead and doesn't all escape via the indicator.
To retrofit the indicator, you'll need to tap a hole for a fitting in
your powerhead's water jacket, put a hole in your lower cowling for a
bulkhead indicator fitting and run a hose between the two.
If you have an early 80s or late 70s motor, it may be adviseable to
relocate, or modify the routing of the indicator's plumbing. Service
bulletins have been included in the appropriate engine section where
available. Included is a section on modifications at the end of the FAQ
to cover some of these procedures.
Adding the indicator outlet to the block
OMC's early tell-tale equiped motors tapped into the bottom of the
water jacket through the exhaust cover for the indicator's source. It
was later realized that tapping in high up on the powerhead had the
added benefit of removing any air-pockets in the cooling system, as
well as draining the entire system after use. The latter has
substantial benefit for winter storage in cold climes. Most later model
OMCs had their tell-tale outlets located high up on the exhaust cover
for these reasons.
In retro-fitting a tell-tale, you have many choices for locating the
indicator outlet on the block. Certainly, the exhaust cover is one, but
on some blocks there are better choices. Wherever you choose to locate
it, higher is better.
At the chosen location you'll need to drill an 11/32" hole and tap it
with a 1/8" pipe tap. This will accept either the OEM outlet elbow
(P#321886 0r Sierra # 18-3290), or a 1/8" threaded bronze nipple from
the hardware store. All of these accept a 3/16" to 5/16" ID hose (P#
321887, 913435, or 327721) that
will run to a bulk-head fitting (P# 0321885) through the lower cowling. When
drilling the hole, apply grease to the drill bit to capture any metal
shavings, and be sure to use a light oil on the tap so the threads are
cut properly.
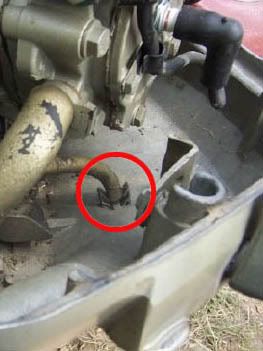
V-4 blocks
The V-4 configuration presents some interesting issues for locating the
indicator outlet. Typically the V-4s run hot on the starboard side.
That's because of a tendency to develop air pockets high up on cylinder
#1. By adding the indicator outlet to the top of the water jacket above
cylinder #1 you provide an opportunity to "burp" any air out of the
system and fix this issue. On many of the '73-'77 V-4 blocks there's a
cast-in round boss just perfect for locating the indicator outlet. If
you don't happen to have that boss, you can go in through the top, just
behind the coil brackets also.

Location of the cast-in boss w/ hole tapped.
This location puts the outlet at a high spot in the cooling jacket.
Also, since it's to the side of the block, it's easier to route to the
side of cowling for the bulkhead fitting than an outlet located on the
exhaust cover.
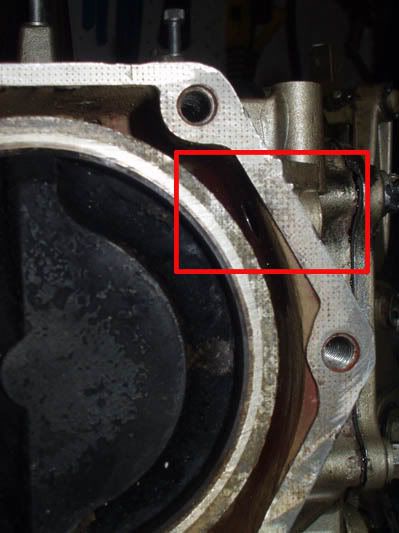
Using the boss provides access high up on cylinder #1's water jacket.
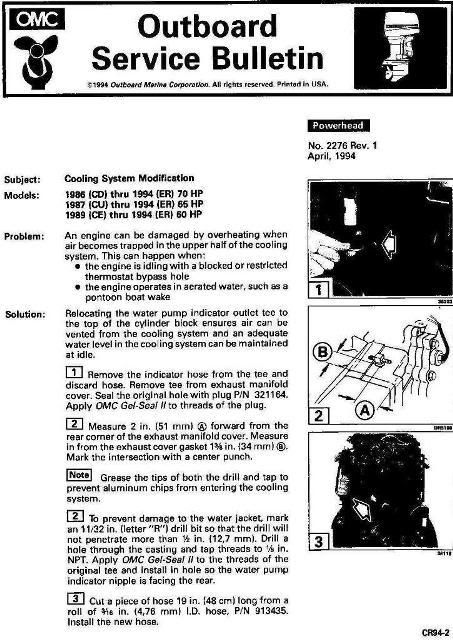
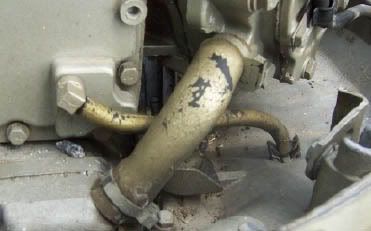
Inline 3-Cylinder Blocks
The recommendation for the inline threes is to place the indicator at
the top of the cylinder block as per the following service bulletin.
Even inline threes with factory installed tell-tales are advised to
relocate from the exhaust cover to the top of the cylinder.
Inline 2-Cylinder Blocks
Mounting the lower cowling bulkhead fitting
Now that you've got the outlet fitting in the powerhead, you need a way
to make the output visible on the outside of the motor. This is done by
drilling a hole in the lower cowling and attaching the OEM indicator
cowling fitting (P #321885) in a place that will be easily visible.
This is usually placed in the rear of the lower cowling on the
starboard side.
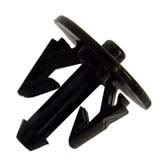
Lower cowling fitting
This fitting clips into a 11/16" hole. Now, not all of us have drill
bits that big. You can get by with drilling a smaller hole and making
an oval for the two clips with a small round file.
The fitting then simply clips into the hole from the outside of the lower cowling.
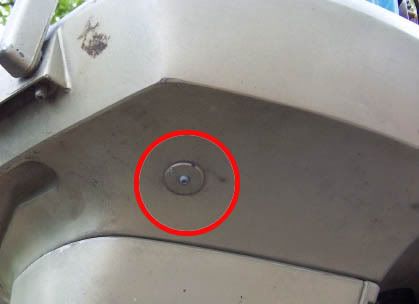
Indicator outlet lower cowling bulkhead fitting from the outside
Indicator outlet lower cowling bulkhead fitting from the inside
Routing the hose
Now that you've got both fittings in place, you just need to connect
them up with a hose. If you have not tapped the powerhead outlet into
the very top of the #1 cylinder, it is adviseable to route the hose in
such a way that some part of the hose raises above the powerhead. This
will prevent air pockets from forming in the powerhead and creating hot
spots. Use zip-ties to clamp the hose onto the fittings, or leave
unclamped. There is very little pressure on the hose and it won't leak
if it's in good shape.
Adviseable Modifications to Early Systems
Service Bulletins
Service buletins containing re-location or re-routing instructions
specific to engine type are located above in the followign sections:
Other Modifications
Many of the early systems tapped into the water jacket at low point,
and ran the outlet hose straight down to the bulkhead fitting. This
configuration can cause air bubbles to enter the water jacket and cause
hot-spots.
Early OMC low-placed outlet with direct drain
If you don't want to relocate the outlet to a higher spot on the
engine, it is adviseable to re-route the hose over the engine block to
prevent air from entering the system.
The Short and Sweet
- Drill 11/32" hole in powerhead providing access to the water jacket, thread with 1/8" pipe tap.
- Fit 1/8" pipe fitting with 5/16" nipple into the hole using either
- Outlet elbow (P#321886 0r Sierra # 18-3290)
- Similar bronze fitting
- Drill 11/16" hole in lower cowling.
- Fit bulkhead fitting (P# 0321885) in place from the outside.
- Run a 3/16" to 5/16" ID hose (P#
321887, 913435, or 327721) connecting the powerhead fitting to the bulkhead fitting.